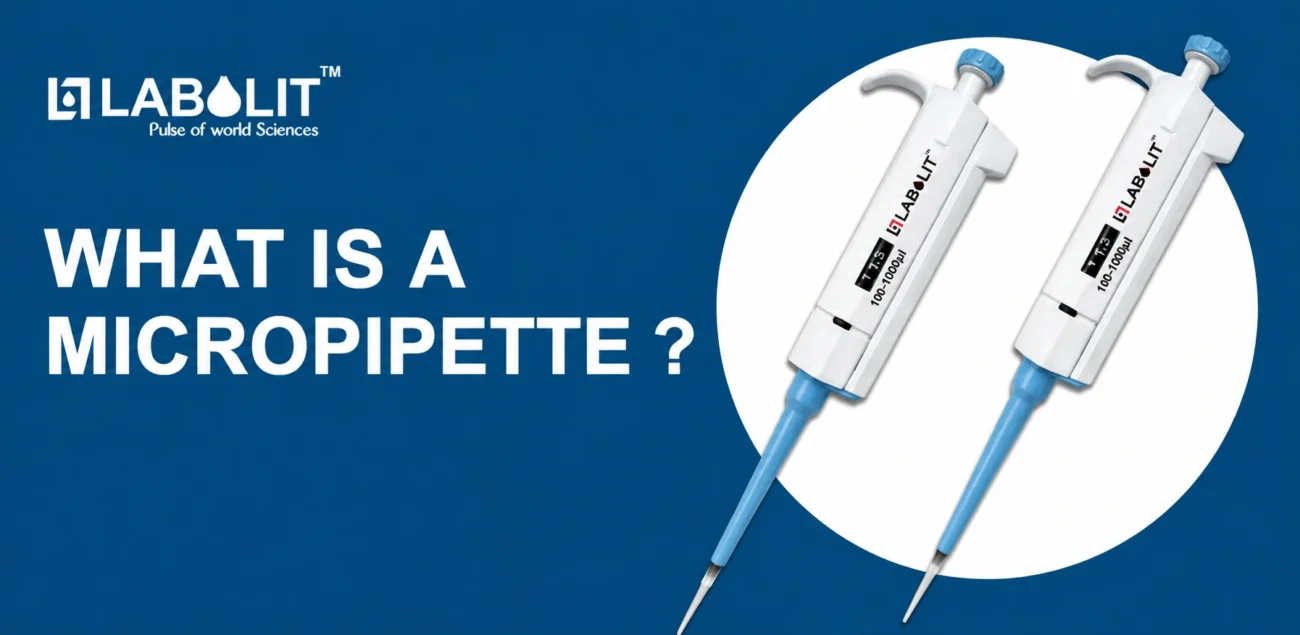
Micropipette Diagram: Complete Guide to Parts, Working, Types & Uses


A micropipette diagram helps users understand the structure, important components and working mechanism of a micropipette. Micropipettes are precision laboratory instruments used to accurately aspirate and dispense small quantities of liquid.
They are widely used in pharmaceutical laboratories, biotechnology, microbiology, molecular biology, diagnostic laboratories, hospitals, research institutes, universities and educational laboratories.
Understanding a micropipette diagram is especially useful for students, laboratory technicians, researchers and professionals who want to learn how a pipette works and how each component contributes to accurate liquid handling.
LABOLIT Private Limited provides laboratory liquid-handling solutions, including single-channel, multichannel and other micropipette configurations for customers across India and worldwide.
Micropipette Diagram and Its Main Parts
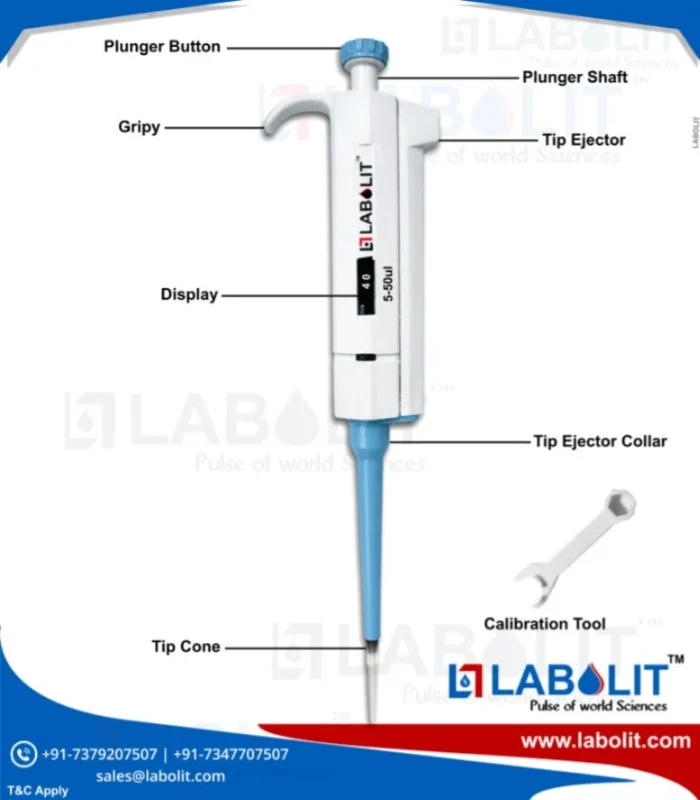
A standard mechanical micropipette consists of several important components. Although the exact design can differ between models, the major parts generally include:
- Plunger button
- Volume adjustment mechanism
- Volume display
- Tip ejector button
- Tip ejector
- Shaft or nozzle
- Pipette tip
- Handle/body
- Internal piston mechanism
- Seal and O-ring components
Each part performs a specific function during liquid aspiration and dispensing.
Micropipette Parts Explained
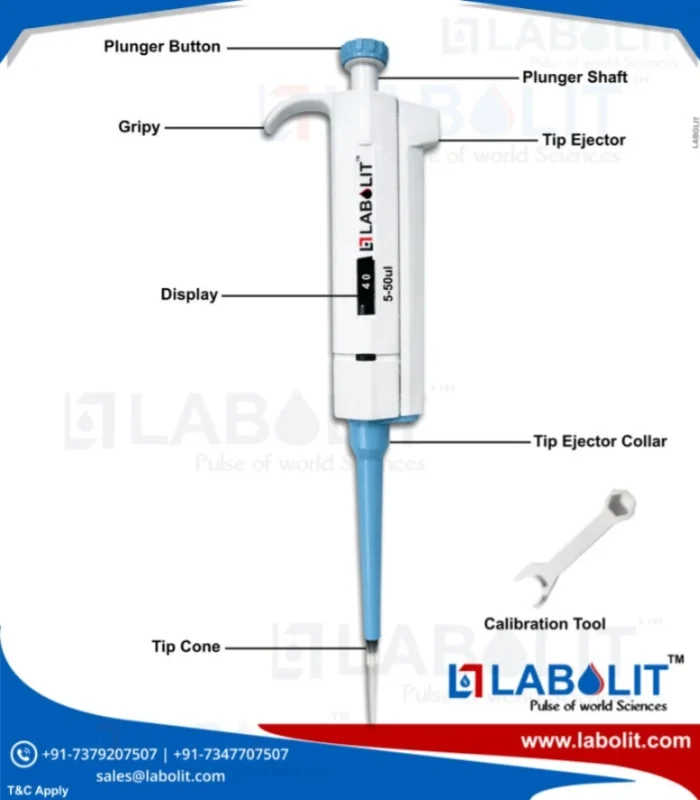
1. Plunger Button
The plunger button is located at the top of a manual micropipette.
It is pressed by the operator to control aspiration and dispensing. Many mechanical pipettes use two-stage plunger movement.
The first stop is generally used for aspirating the selected volume, while the second stop is used during dispensing and blow-out.
2. Volume Adjustment Knob
The volume adjustment mechanism allows the user to select the required liquid volume.
For a variable-volume micropipette, the volume can be changed within the specified operating range of the model.
Users should never force the adjustment mechanism beyond the specified volume range.
3. Volume Display
The micropipette volume display shows the selected volume.
The display may contain multiple digits depending on the pipette’s volume range and design.
Correctly reading the display is important because selecting an incorrect volume can affect the amount of liquid transferred.
4. Tip Ejector Button
The tip ejector button allows the used pipette tip to be removed without touching it directly.
This can improve convenience and help reduce contamination during laboratory workflows.
5. Tip Ejector
The tip ejector mechanism transfers the movement of the ejector button to the lower portion of the pipette, helping release the attached tip.
6. Shaft
The shaft connects the main body of the micropipette to the tip attachment area.
The lower shaft is designed to accept a compatible pipette tip.
7. Pipette Tip
The micropipette tip is the disposable component that comes into contact with the liquid.
Tips are available in different capacities and formats. Using a compatible tip is important for proper pipetting performance.
8. Handle and Body
The main body provides the structure required to hold and operate the pipette.
Professional ergonomic designs are intended to make repetitive pipetting more comfortable.
9. Piston Mechanism
The piston is an important internal component of a mechanical micropipette.
Movement of the piston creates the pressure difference required to aspirate and dispense liquid.
10. Seal and O-Ring
Sealing components help maintain the required internal pressure during aspiration and dispensing.
The condition of these components can affect pipetting performance.
Micropipette Diagram: How Does It Work?

The basic working principle of a mechanical micropipette is based on air displacement.
The simplified process is:
Plunger Press → Tip Immersion → Plunger Release → Liquid Aspiration → Dispensing → Tip Ejection
Step 1: Set the Volume
First, adjust the micropipette to the required volume within its specified range.
Step 2: Attach the Tip
Attach a compatible pipette tip firmly to the tip cone.
Step 3: Press the Plunger
Press the plunger to the appropriate stop before immersing the tip into the liquid.
Step 4: Aspirate Liquid
Place the tip at the appropriate depth in the liquid and slowly release the plunger.
The pressure change draws liquid into the pipette tip.
Step 5: Dispense Liquid
Move the pipette to the receiving vessel and press the plunger smoothly.
The liquid is dispensed from the tip.
Step 6: Eject the Tip
After completing the transfer, use the tip ejector to remove the used tip.
Micropipette Diagram: Air Displacement Principle
In a typical air-displacement micropipette, the piston moves inside the pipette mechanism.
When the plunger is pressed, the internal air volume changes. When the plunger is released with a tip immersed in liquid, the resulting pressure difference draws liquid into the tip.
When the plunger is pressed again, the liquid is expelled.
This simple principle enables controlled transfer of small liquid volumes.
Single Channel Micropipette Diagram
A single channel micropipette has one tip connection and transfers one liquid sample at a time.
A simplified diagram can be understood as:
Plunger
↓
Volume Adjustment
↓
Volume Display
↓
Pipette Body
↓
Tip Ejector
↓
Shaft
↓
Pipette Tip
Single-channel micropipettes are commonly used for routine laboratory procedures and applications where samples are handled individually.
Multichannel Micropipette Diagram
A multichannel micropipette contains multiple liquid-transfer channels.
Common laboratory configurations include:
- 8-channel micropipette
- 12-channel micropipette
A simplified structure is:
Plunger / Operating Mechanism
↓
Volume Adjustment & Display
↓
Main Body
↓
Multichannel Shaft Assembly
↓
Multiple Tip Cones
↓
Multiple Pipette Tips
Multichannel micropipettes are particularly useful for microplates and repetitive sample-transfer applications.
Electronic Micropipette Diagram
An electronic micropipette replaces much of the manual piston operation with an electronically controlled mechanism.
Typical components may include:
- Digital display
- Control buttons
- Electronic motor/mechanism
- Battery system
- Volume control
- Tip ejector
- Shaft
- Pipette tip
Electronic models can provide additional operating modes depending on the product configuration.
Micropipette Drawing vs Micropipette Diagram
The terms micropipette drawing and micropipette diagram are often used interchangeably, but they can serve slightly different purposes.
A micropipette drawing may simply show the external shape of the instrument.
A micropipette diagram generally provides more information by identifying components and explaining their functions.
For students and laboratory training, a labelled micropipette diagram is especially useful because it makes the relationship between different parts easier to understand.
Micropipette Volume Display and Reading
The micropipette reading is the volume shown on the instrument’s display.
The way the digits should be interpreted depends on the particular micropipette’s volume range and display configuration.
For example, a micropipette designed for a small-volume range will have a different display interpretation from a high-volume micropipette.
Important Rule
Always check the manufacturer’s instructions for the exact model before interpreting the volume display.
Incorrect interpretation of the display can result in incorrect liquid transfer.
Micropipette Tips
A micropipette cannot normally be used without an appropriate tip.
The tip provides the disposable liquid-contact interface between the instrument and the sample.
Important considerations include:
- Tip compatibility
- Volume capacity
- Tip quality
- Sterility requirements
- Application
- Sample type
For reliable results, users should use compatible tips recommended for the particular micropipette model.
Micropipette Calibration
Micropipette calibration is an important part of laboratory quality management.
Calibration helps verify whether the pipette delivers the expected volume within the applicable performance requirements.
Factors that can affect pipetting performance include:
- Incorrect technique
- Temperature
- Liquid properties
- Tip compatibility
- Seal condition
- Contamination
- Mechanical wear
- Improper storage
LABOLIT provides a calibration report with applicable micropipette models, helping laboratories maintain product documentation.
LABOLIT Micropipette Range
LABOLIT Private Limited offers micropipette solutions for different laboratory requirements.
The LABOLIT range can include:
- Single-channel micropipettes
- Variable-volume micropipettes
- Fixed-volume micropipettes
- 8-channel multichannel micropipettes
- 12-channel multichannel micropipettes
- Electronic pipette solutions
- Fully autoclavable models
- Pipette tips
- Pipette stands
- Liquid-handling accessories
Different LABOLIT models are designed for different applications and volume requirements.
LABOLIT Micropipette Box Contents
For applicable LABOLIT micropipette models, the product package can include:
- LABOLIT Micropipette
- Pipette Calibration Key
- 2 Pipette Tips
- User Manual
- Warranty Card
- Calibration Report
The exact contents can vary depending on the selected model and package configuration.
3-Year Replacement Warranty
Applicable LABOLIT micropipettes are supported by a 3-year replacement warranty, subject to the applicable warranty terms and conditions.
The warranty provides customers with additional confidence when selecting LABOLIT laboratory liquid-handling products.
Customers should retain their warranty card, calibration documentation and purchase information for future service or warranty requirements.
Applications of Micropipettes
Micropipettes are used across a wide range of laboratory applications.
Pharmaceutical Laboratories
Used for controlled transfer of reagents, samples and solutions.
Biotechnology
Used in molecular biology and biotechnology workflows.
Microbiology
Used for transferring cultures, reagents and small liquid samples.
Diagnostic Laboratories
Used for sample preparation and laboratory testing procedures.
Molecular Biology
Micropipettes are commonly used in workflows involving DNA, RNA, PCR and related laboratory processes.
Educational Laboratories
Students use micropipettes to learn precision liquid handling and laboratory techniques.
How to Choose a Micropipette?
When selecting a micropipette, consider:
- Required volume range
- Single or multichannel operation
- Mechanical or electronic mechanism
- Accuracy and precision requirements
- Tip compatibility
- Autoclavability requirements
- Frequency of use
- Calibration requirements
- Warranty and service support
- Budget
The cheapest micropipette is not necessarily the best choice for every application. The correct volume range and appropriate design should be considered first.
Why Choose LABOLIT Micropipettes?
LABOLIT focuses on laboratory liquid-handling solutions for professional and institutional users.
Key considerations for customers include:
- Multiple micropipette configurations
- Single-channel options
- Multichannel options
- Different volume ranges
- Applicable autoclavable models
- Calibration documentation
- Pipette calibration key
- Compatible tips
- 3-year replacement warranty on applicable models
- Bulk supply
- OEM and private-label opportunities
- Worldwide service and supply
LABOLIT Private Limited serves customers across India and worldwide.
Frequently Asked Questions About Micropipette Diagram
What is a micropipette diagram?
A micropipette diagram is a labelled representation of a micropipette showing its major components and structure.
What are the main parts of a micropipette?
The major parts include the plunger, volume adjustment mechanism, volume display, tip ejector, shaft, tip and internal piston and sealing mechanism.
What is the use of a micropipette?
A micropipette is used to accurately aspirate and dispense small quantities of liquid.
What is the difference between a micropipette drawing and diagram?
A drawing may show the physical appearance of a micropipette, while a diagram generally identifies components and explains their functions.
What is a single-channel micropipette?
A single-channel micropipette transfers liquid through one channel and is commonly used for individual sample handling.
What is a multichannel micropipette?
A multichannel micropipette has multiple liquid-transfer channels and is useful for repetitive microplate applications.
Does LABOLIT provide a calibration report?
Yes, a calibration report is included with applicable LABOLIT micropipette models.
What comes in the LABOLIT micropipette box?
Applicable packages can include a LABOLIT micropipette, calibration key, 2 tips, manual, warranty card and calibration report.
What warranty does LABOLIT provide?
Applicable LABOLIT micropipettes come with a 3-year replacement warranty, subject to applicable terms and conditions.
Conclusion
A micropipette diagram is an effective way to understand the construction, parts and working principle of a precision liquid-handling instrument.
Understanding components such as the plunger, volume adjustment mechanism, display, tip ejector, shaft, piston and pipette tip can help users operate a micropipette correctly and maintain good laboratory practices.
Whether you require a single-channel micropipette, multichannel micropipette or electronic pipette, selecting the correct volume range, compatible tips and appropriate features is essential.
LABOLIT Private Limited provides laboratory liquid-handling solutions with applicable models supplied with a pipette calibration key, 2 tips, manual, warranty card and calibration report, along with a 3-year replacement warranty subject to applicable terms.
LABOLIT serves laboratory customers across India and worldwide, including suitable bulk, dealer, OEM and private-label requirements.
Contact LABOLIT
Sales & Orders: +91 7347707507 | +91 7379207507
Purchase: +91 7348107507
Complaint / Service: +91 7408107507
Email: sales.labolit@gmail.com
Website: labolit.com